|
|
|
|
Teacher's Guide
|
| Introduction |
This classroom guide begins with a fleshing out of the superb
ideas outlined on pages 215-217 of the National Research Council's
National Science Education Standards. The purpose in
writing it out in this format is to help bridge the gap between
having brilliant ideas for the classroom and implementing an
actual lesson so that students can achieve the desired goals. The
lesson plan included below is rather structured, largely for the
purpose of helping us at Scopes for Schools (who have limited
educational experience) keep organized in the classroom.
Naturally, this plan can be altered to better meet our goals
according to the instincts of more experienced educators (we
always appreciate feedback from teachers on this issue), but you
should expect it to take about five class periods.
|
| Overview |
top
Ultimately, these lessons will give students an idea of how
distances and sizes are measured in the solar system. Students
will actually learn the basic principles required to build a scale
model of the solar system! Along the way, they will work
intensively with some basic mechanics of the solar system, with
proportionality, and with geometry.
The core activity will take about five class days, and it very
nicely sets up a few one-day offshoot activities such as the scale
model of the solar system or measuring the diameter of a sunspot.
This series of lessons can either be taught as a coordinated
effort between math and science teachers or by a single teacher
working alone. It starts with (for example) a science teacher
showing students a couple of photographs of the sky taken an hour
or so apart. The students will observe that there appears to be
one star (Polaris, the North Star) that doesn't move, while all
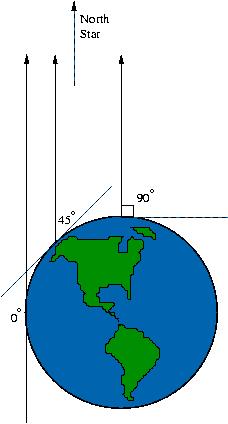
others do. Students are challenged to figure out from this simple
observation where Polaris would appear in the sky if you were
standing on the North Pole (straight up). Where would it appear to
someone standing on the equator? The first major goal of this
activity is for students to come up with a correct model (or
diagram) describing how the Polaris lies in line with the Earth's
axis, but many Earth diameters away, and to use this model to
relate the angle of elevation of the North Star to latitude on
Earth.
With this relationship known, we can take two locations on
Earth, one due south of the other and a known distance apart, and
by knowing the angle of elevation of Polaris viewed from each
location, the kids can figure out the latitude of each place, and
with a little thought they can figure out the circumference of the
Earth from this information. Once they know how big the Earth is,
they can determine how far a point on its surface moves in the
course of an hour due to rotation (1/24th of the
Earth's circumference if the point is on the equator).
With precise enough methods, we could measure the angle of
elevation of a celestial body (e.g., the Moon) at a couple of
times or from a couple of different locations. A careful diagram
and a little mathematics (similar triangles, in particular) can
then yield the distance to the object (scientists call this method
and its variations parallax). Once the distance to, say,
the sun is known, the diameter can be determined with a simple
experiment and another application of proportionality. This key
observation sets up other nice activities. Interestingly,
scientists built up their precise methods using cellestial bodies
themselves: they figured out the distance to the Moon using the
size of the Earth, then they figured figured out the distance to
the Sun using the size of the Earth-Moon system, and then they
figured out the distance to other stars and planets using the size
of the Earth-Sun system!
Connections:
-
After this activity, the students can see how simple it is in
principle for scientists to measure the planets' sizes and
distances to Earth -- designing a scale model of the solar
system requires only ideas the students themselves have
developed! (though it might take very precise instruments)
-
Since the Polaris can tell us our latitude, it's no great
mystery how sailors in previous centuries were able to sail all
the way across the Atlantic Ocean and land at the exact port
they wanted.
-
Exercises in proportionality: Since we now know how big the
sun and the planets are, we can get pictures from the web (try
the Big Bear Solar
Observatory or the Hubble
Space Telescope Gallery) and figure out the size of a
sunspot or a solar flare or Jupiter's Great Red Spot!
|
| Lesson Goals and
The National Standards |
top
The importance of the relationship between the procedures
outlined in this guide and the NRC's National Science Education
Standards cannot be over-stated. In fact, the goals of this
activity consist of standards we hope will be realized for the
students. For a discussion of the relevant standards and the goals
and rationale underlying this activity, please follow this
link.
|
| Materials |
top
- Either a few pictures of the night sky taken facing north
from an unchanging spot and at one-hour intervals (it helps to
get a tree or a building in the shot for reference), or a
picture that shows time-lapse star trails, like
this one,
- Graph paper (one sheet per three students should be plenty),
- Protractors (again, one per three students),
- Overhead Projector, or some other way to plot some points
for the class.
|
| The Plan, Day
One |
top
Five to ten minutes to get things started:
Once you've got the class warmed up, explain that over the next
couple of days they'll be using the stars to see how astronomers
in Columbus' day estimated the size of the Earth and how more
recent astronomers estimated the distance to the Sun, the size of
the Sun, and the size of- and distance to the planets. Show them
the image(s) of the northern sky at night. The first major goal is
for the kids to explain the movement the image reveals.
Ten to fifteen minutes to analyze the stars' motion:
Break the class up into groups to answer the question, "There
is one star which doesn't appear to move over time. This tells us
that the this star must have a very special location relative to
the Earth. Where is it?" The groups that finish early can move on
to some other questions: Where would this star appear if you were
right at the equator? At the north pole? Do they know this star's
name? (the North Star, also called "Polaris")
Ten Minutes for reporting out with brief discussion:
 Bringing the class back together for discussion (but
keeping everyone seated with their groups), sketch the Earth on
the chalkboard and ask where the odd star is. If there are
discrepencies, ask for explanations and see if the kids can reach
a consensus. Once the class can agree on the correct model, draw a
dot on the north pole and ask where the star would be if you were
standing at the north pole (answer: straight up). (What is
this star called?) Do the same for a point on the equator (this
time, the star would appear on the horizon). Bringing the class back together for discussion (but
keeping everyone seated with their groups), sketch the Earth on
the chalkboard and ask where the odd star is. If there are
discrepencies, ask for explanations and see if the kids can reach
a consensus. Once the class can agree on the correct model, draw a
dot on the north pole and ask where the star would be if you were
standing at the north pole (answer: straight up). (What is
this star called?) Do the same for a point on the equator (this
time, the star would appear on the horizon).
Last fifteen minutes to explore the model further:
Working in groups with protractors and graph paper, have the
students figure out where the star would appear to an observer
standing on a point half way between the point on the equator and
the north pole. Tell them it is very important that they write out
their reasoning and use careful diagrams so they can use today's
work tomorrow. Challenge groups that finish early to work on
points with other latitudes, such as 1/3, 2/3, 1/6 or 5/6 of the
way up from the equator.
The questions on this homework
worksheet should help the students solidify some of the
concepts encountered today.
|
| The Plan, Day Two
|
top
About twenty-five minutes for some discussion
Let's see, where were we? We were trying to figure out what the
North Star's angle of elevation would be if were standing at
various places on Earth. It might be helpful to make a chart on
the board, with two columns, Location (fraction) and Elevation
(degrees). What angle of elevation did we come up with for the
equator? (Zero degrees) What about at the north pole?
(Ninety degrees) Half-way in between? (45 degrees,
though they may need to discuss a bit to come to agreement)
Does anyone else have other points to put up? Based on this
information, does anyone have an idea of how location and
elevation are related? How about ideas for expressing this
information differently so that we might better see a
relationship? (plotting the Elevation vs Location might be a
good idea!) 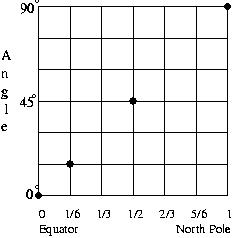
Plot the information, with location on the x-axis and elevation
on the y-axis. Can anyone suggest a relationship now (that is,
where would other points go on the graph)? If no ideas spring
forth, it might help to get more points on the graph (you can
either break into groups for this, or do it as a class). With
enough points on the graph, someone will undoubtably suggest that
the graph should be a straight line. (Be on the look-out now for
students who try to express what this really says: Viewed some
fraction of the way from the equator to the north pole, the star's
angle of elevation is that same fraction of 90°!) 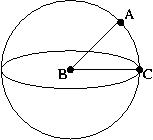
This is a great time to make sure everyone understands what
latidude means. It is the measure of the angle made between some
point A on Earth, the center of the Earth B, and a point C on the
equator due south (or north) of A. So all points on the equator
have zero degrees latitude, the north pole is 90° north, and a
point half-way in between is 45° north. In terms of latitude, what
does our graph say? (Answer: Latitude equals angle of
elevation!)
At this point, we haven't really proved that latitude
equals angle of elevation, but we have strong reasons to believe
this is the case. If you have the time to prove it or are working
with a math teacher who is interested, then we encourage you to
present a proof.
Last twenty minutes to estimate the size of the Earth:
Now we know that the North Star's angle of elevation tells us
our latitude. Can anyone think of how someone five hundred years
ago could use this information to figure out how big around the
Earth is? Hint: They had reasonably accurate estimates of the
distances between cities back then. In fact, Eratosthenes
used observations like these to come up with a fairly accurate
measure of the circumference of the Earth over 2000 years ago!
(Carl Sagan's Cosmos, Episode 1: The Shores of the Cosmos
has more on this.)
Let's look at a specific example (you may want to have the kids
come up with their own more precise examples using a map):
According to my map, Milwaukee is about 100 miles due south of
Green Bay. In Green Bay, the North Star appears about 1.5° higher
in the sky than in Milwaukee. How could we use this information to
figure out how big around the Earth is? This is worth a few
minutes' open-ended discussion. If the kids need help, you might
show them how you can illustrate the situation by drawing a
quarter circle with a protractor, with dots at 1.5° apart; the
distance between the points is 100 miles.
This should be enough of a hint to set the students onto the
task of determining the circumference of the Earth in their groups
for the remainder of the hour. Remind them to keep careful notes
of their reasoning for use tomorrow. If they finish early, have
them consult a map for more precise estimates of the latitudes and
distances. If a student's group does not finish finding an
estimate, it should be finished for homework.
|
| The Plan, Day Three
|
top
About fifteen minutes for discussing yesterday's results.
Last time, the kids finished the hour using the difference in
the North Star's angle of elevation in Green Bay and Milwaukee
(1.5°), along with the fact that Green Bay is about 100 miles due
north of Milwaukee, to figure out the distance around the Earth.
Let's see what they came up with. How many of the groups completed
the task? Before getting numerical answers, try to get an
explanation or two of how the groups approached the
problem. How do these estimates compare with the known
circumference of the Earth (about 24,812 miles around the poles)?
About five minutes to introduce the next task:
Now that we have an estimate of the size of the Earth, can
anyone think of a way to estimate the distance to the moon? What
observations would we need in order to estimate this distance? It
might help to draw a diagram on the board:

If they draw blanks for too long, you might ask how knowing the
size of the Earth can help. Do they see any connection? More help:
If the Earth is about 24,000 miles in circumference, how far do we
travel due to rotation in one hour? (answer: about a thousand
miles). How can we use this information?
About fifteen minutes to think about an approach:
Break the kids up into groups to discuss the question, "How can
we use the known circumference of the Earth to determine the
distance to the Moon? Encourage them to draw diagrams and
communicate their methods to their group partners.
[It should be noted that while there are several
ways to measure the distance to the moon, I outline only one here.
If the students come up with other reasonable methods, tell them
to go for it! Also, this method doesn't really fit into the
historical progression of such measurements very neatly - the
ancients compensated for a lack in precise instrumentation with
very elaborate reasoning, which is hard to motivate and in any
event not appropriate for eighth graders.
This activity might be a bit too hard for eighth graders, so
you may need to help steer them towards a solution such as this:
We know we move about a thousand (more precisely, 1034) miles in
an hour. If we measure the angle of elevation of the Moon at a
couple of times an hour apart, we can figure out "Angle a" in this
diagram:

Then we could just draw a triangle similar to the one made by
the Moon and the two points we observed from. Now, 1000/(distance
to Moon) = (measure of small side of triangle)/(measure of larger
side), so we can figure out the distance to the moon!
About ten minutes for discussion:
Hopefully, every group will now have an idea of how the
distance to the Moon can be measured, so let's see what they came
up with. Here are a couple issues that may arise during this
discussion:
- The moon is orbiting around the Earth at a rate of 360° per
29.5 days, or about 0.5° per hour, so we would have to add a
half a degree to our measure of "Angle a" to account for this.
This optional worksheet
guides the students in figuring this out for themselves. The
worksheet may be too hard (you be the judge!) for a homework,
but might make a nice group assignment in either a math or
science class. Alternatively, the first two questions could be
homework, with the third worked through in the next class.
- Since the Earth rotates 15° in an hour, if we were actually
standing outside measuring the angle of elevation of the Moon at
two different times and subtracting, we would have to add or
subtract 15 degrees to account for the Earth's rotation.
It turns out that to actually measure the distance to the moon,
the angle we'd need to measure is quite small (about 0.25°) and
consequently very difficult to measure with enough precision
(though it can be done with care and patience!). It's probably
best to circumvent this precision problem, along with problems 1
and 2 (above) by simply giving the students the measure of the
angle: in terms of the diagram above, Angle a is about
0.25°. (This is too small to draw with a protractor, but we can
theoretically construct it anyway: Think of the triangle as a
wedge cut out of a giant circle centered at the moon, with the
Earth on its edge. This circle is so big that an angle of 0.25°
traces out a thousand miles of the circumference! So the entire
circumference, traced out by 360°, would have to be 360*4*1000 =
1,440,000 miles. So the radius (the distance from the Earth to the
moon, if you're following) has to satisfy 2*Pi*r = 1,440,000
miles, so r = 1,440,000/(2*Pi) miles, or r = 229,000 miles.) Next
time, use this information to guide the students in determining
the distance to the Moon!
|
| The Plan, Day Four
|
top
Five to ten minutes for review:
Take a few minutes to remind everyone where we were. Make sure
all the groups are up to speed and ready to finish answering the
question at hand: How far is it to the Moon?
Fifteen minutes to calculate the distance:
Break up into groups and have them finish the task at hand. In
fifteen minutes, each group should know the distance to the Moon!
The rest of the hour for discussion and seguey into the next
task, distance to the Sun:
Well, how far is it to the Moon? What did the kids come up
with? (Since the Moon's path is elliptical, the actual distance
varies between 225,000 and 252,000 miles. If you trusted my
numbers and calculated the Earth's circumference to be 24,000
miles, then an hour's movement of 0.25° yields a distance of
229,000 miles. Using the accepted circumference of 24,812 miles,
you get a distance of about 237,000 miles, which is very near the
average distance.)
Now let's see if our experiences with the moon are helpful in
figuring out the distance to the Sun. In determining the distance
to the Moon, we measured angles to figure out the shape of the
triangle made by two points on the Earth's surface and a point on
the Moon. To finally determine the distance, we had to know how to
scale this triangle, which we determined by knowing how big one of
its sides is, the side on the Earth, and thinking of the triangle
as a wedge cut out of a big circle. When astronomers first
measured the distance to the Sun, they couldn't use the
exact same method because the angle they would have had to measure
would have been way too small to measure, something like 0.0005°!
One idea they used to fix this was to look for a triangle that
didn't require such a tiny angle. Over 2000 years ago, the Greek
astronomer Aristarchus
used the Moon to make such a triangle: 
[To be honest, it should be pointed out that this
method has some practical problems. In particular, it was
historically really hard to tell when precisely half of the moon
was illuminated, and hence hard to know when the Earth-moon-Sun
angle was really 90°. Because of this problem, Aristarchus'
initial measurement of the distance to the Sun was not very
accurate, and more elaborate measurement schemes were required.
However, with today's instrumentation this wouldn't be such a
problem (eg, with a telescope such as the one made with Scopes for
Schools, you could easily tell exactly when a point half-way
across the face of the moon marks the division between light and
dark).]
|
| The Plan, Day Five
|
top
About twenty minutes to discuss as a class the problem of
measuring the distance to the Sun.
What question were we working on last time? How do we
measure the distance to the Sun? Can anyone remind us what
general direction we were headed in?
Why were we looking at this triangle rather than one made by
two points on the surface of the Earth? Two points on the Earth
are too close together - the small angle at the Sun would be too
small to measure precisely. If we can figure out the shape of
this triangle and how to scale it (the length of one side), then
we'll be able to determine the distance to the Sun. Can anyone get
us started?
A Couple of points they might notice:
- The length of the small side is just the distance to the
Moon, which we now know;
- The way it's drawn, the angle at the Moon is 90° How
would we know when this angle really is 90°? It's when
exactly half of the Moon is lit by the Sun.
- If we can measure the angle at the Earth, then the angle at
the Sun is just 90° minus the angle at the Earth.
We now have a side length, so we know how to scale this
triangle. We just need to finish figuring out it's shape. Can
anyone see a way to measure the angle at the Earth? With enough
prodding, they will notice that the point on Earth where the Moon
is directly overhead at Half-Moon, and the point where the Sun is
directly overhead at the same time seem to be relevant. In fact,
the angle at the Earth is exactly the difference in
longitude between the point where the moon is directly
overhead and the point where the Sun is directly overhead at
precisely the time of half-moon.
The rest of the hour to determine how far away the Sun
is!
It turns out the angle at the Earth would measure about 89.85°
(That doesn't leave much for the angle at the Sun - only 0.15°!)
From here, the distance to the Sun can be measured in a way
similar to how we measured the distance to the moon. See how much
the students can figure out for themselves. For the teacher's
own reference, here's how I think through this one: This time,
it's a giant circle centered at the Sun, and passing through the
Earth. An angle of 0.15° corresponds to about 237,000 miles, so
the whole circumference is about 360/0.15 times 237,000 miles, or
568,800,000 miles (Whoa!) So the radius, the distance from the Sun
to the Earth, is about 568,800,000/(2*Pi) miles, or about
91,000,000 miles.
|
| Closing Comments
|
top
Hopefully the students now have a clearer conception of the
fact that science is a human endeavor, something carried out by
real people. In particular, the astonishing scale of the solar
system may seem a bit more believable now that the students have
had a chance to see that measuring distances to objects in the
solar system requires no magic, but is really a fairly
down-to-Earth task.
Some of the more observant students may also have noticed a
subtle but important trend in the exercises: We started out with a
distance we could measure directly (Milwaukee to Green Bay) and
used this distance to indirectly measure the distance
around the Earth. We then used the distance around the Earth to
indirectly measure the distance to the moon, and the distance to
the moon was used in turn to measure the distance to the Sun. We
could have kept going - the distance to the Sun can be used to
measure the distance to objects even further away, like stars and
outer planets! This general trend is an example of what scientist
sometimes call "boot-strapping," using careful reasoning to build
up the things we can measure. It is central to many scientific
sagas.
|
| Assessment |
top
To help focus the question of whether this activity has met its
goals in the classroom, Scopes for Schools has created this guide
for assessment.
Assessment is a vital tool for Scopes for Schools as we seek to
improve and evaluate our activities and our program as a whole.
After you have had a chance to assess this activity, we would
greatly appreciate a chance to learn from both your specific
experience with the activity and your general experience as an
educator.
We invite any feedback you care to give, and would especially
like to hear about:
- How well the activity met it's goals, as demonstrated by the
assessment;
- What we can do in terms of altering the activity itself or
the assessment techniques to better meet our goals;
- Any suggestions you have ("shoulds" or "should nots") for
future teachers who use this activity.
This questionaire
fleshes out these questions in a way that we have found
particularly helpful.
| |